
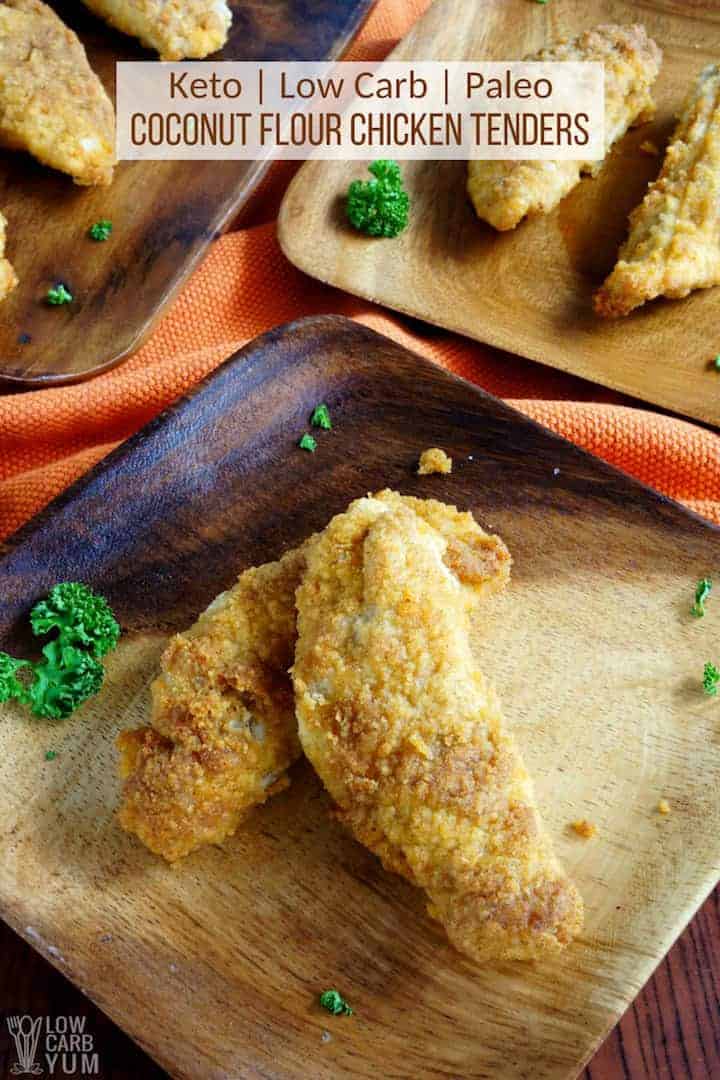
These low carb paleo coconut flour chicken tenders are gluten free and keto friendly. Enjoy them plain or dipped in your favorite sauce. Unbelievably good!
Article Index
My kids really like chicken tenders, but I hate the wheat flour coating. Since my older daughter (the pickiest child) seems to like other recipes I've made with coconut flour, I decided to try and make some low carb baked coconut flour chicken tenders.
This is actually the second recipe I tried. The first one dipped the chicken tenderloins in beaten eggs before coating in the coconut flour mixture, but that batch was very dry. Since making this, I also now love to make a chicken tenders wrapped in bacon.
To get the chicken moist without frying, I knew that some oil was needed. So, in my second attempt at baked coconut flour chicken tenders coated the chicken in olive oil rather than eggs.
What was the result using oil? A juicy chicken underneath a crisp gluten free coconut flour based coating. And the best part? My picky daughter ate three of the tenders without complaining.
How to make Paleo coconut flour fried chicken tenders
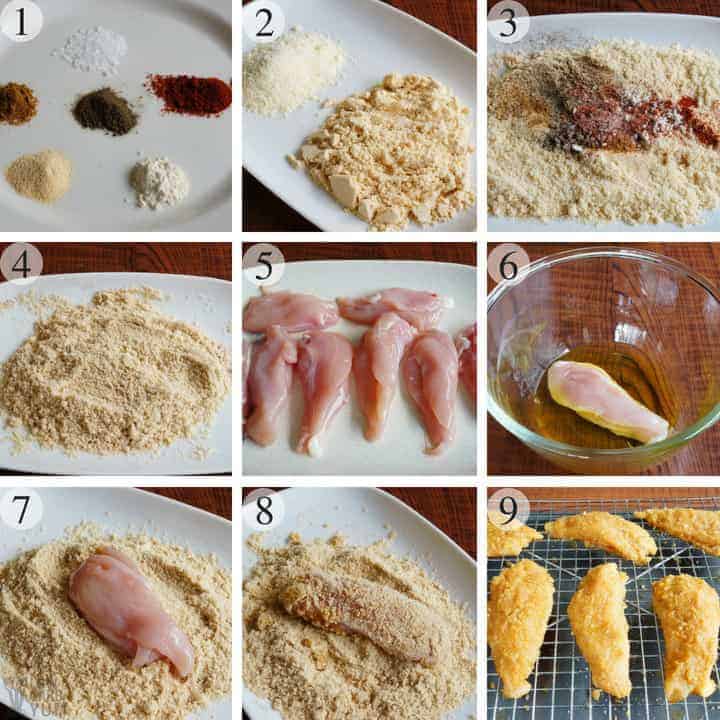
To make the oven fried chicken tenders, simply blend up the spices with coconut flour and either Parmesan cheese or nutritional yeast. (photos 1-4) Nutritional yeast gives a cheesy flavor without added dairy.
Next, you'll want to dip each tender into a little oil (photos 5 & 6) and then coat with the coconut flour mixture (photos 7 & 8). Then, just place on a rack in a baking pan to bake. (photo 9)
Cook's Tips
It's best to spray each tender with oil after coated. This helps to prevent the coconut flour coating from being too dry.
And flipping the tenders about halfway through helps them to cook evenly. Baking on a rack also keeps the coating on better than frying in oil.
An air fryer is another great way make these coconut flour fried chicken without frying in oil! Air fryer chicken tenders are extra juicy too.
Thoughts on the Recipe
I've been trying to move towards a more Paleo low carb diet and this coconut flour chicken tenders recipe is Paleo friendly as well as being gluten free. You'll just want to omit the Parmesan cheese or replace it with nutritional yeast for Paleo.
Although I thought the spice mixture was pretty good, you may want to tweak it a bit to suit your own taste. I recommend using kosher or natural sea salt because those coarser grinds stick best to the meat.
Each chicken tenderloin is drenched in olive oil and then coated in the seasoned coconut flour mixture. It goes really fast so this is something that you could easily make on busy evening. The prep time is about 5 minutes.
I've found that raising the "breaded" meat off the pan helps the coating to crisp up better. I use a regular Baker's cooling rack for this and just place the rack on top of a shallow baking pan.
In addition, flipping the chicken tenders halfway through baking also allows for more even browning.
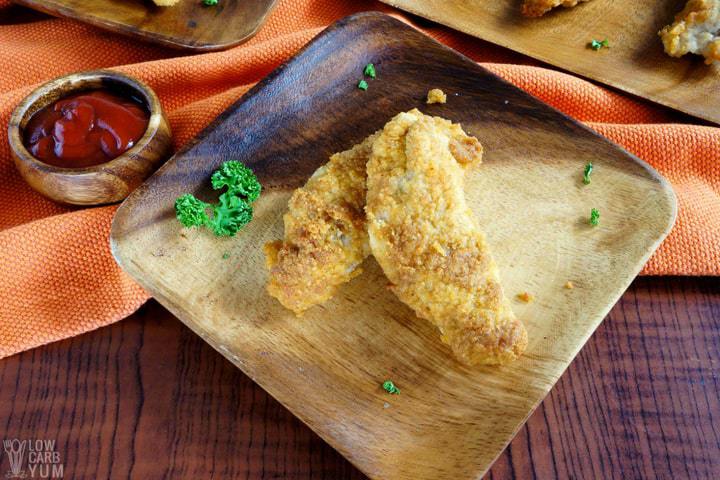
Don't these baked coconut flour chicken tenders look like they were fried? They come out nice and crisp from the oven. The meat stays juicy inside because it is covered in high fat olive oil before adding the seasoned flour coating.
You may also want to check out my low carb chicken nuggets recipe. I find that baking and then frying gives the best results.
Paleo Low Carb Coconut Flour Chicken Tenders

Recipe Updates
UPDATE: I've updated the recipe based on a few comments received. These changes made should result in tenders that are cooked to the right internal temperature (165°F) to reduce drying the meat out from overcooking.
The original baking temperature of 425°F seemed to be too high so I reduced it to 400°F. So the baking time was reduced from 30 minutes total to 20-25.
I tested these with a meat thermometer and they registered 165°F just after 20 minutes. Another comment was the dryness in the coating.
This was fixed by dipping each tender in olive oil and then the dry coating. Since this makes the baked coating soft and moist, I recommend placing the tenders about 6 inches from the broiler (on high) for about 1 minute each side to crisp the outside.
Follow us on FACEBOOK, PINTEREST, and INSTAGRAM for even more tasty keto-friendly recipes!
Recipe

Coconut Flour Chicken Tenders
Video
Ingredients
- ¼ cup coconut flour
- 2 tablespoons grated Parmesan optional
- ½ teaspoon kosher or natural sea salt
- ½ teaspoon ground cumin
- ¼ - ½ teaspoon ground smoked paprika
- ½ teaspoon garlic powder optional
- ½ teaspoon onion powder optional
- ½ teaspoon black or white pepper
- 1 pound chicken tenderloins 6 large pieces (8 smaller pieces)
- 1 large egg beaten
- ¼ cup avocado oil for optional frying
Instructions
- On plate or shallow container, mix coconut flour, Parmesan and spices with a fork.
- Beat egg in small container. Drench each tenderloin in egg then gently press each chicken tenderloin in coconut flour mixture. Spray extra olive oil over the coating until wet to prevent dryness (or they can be fried after baking)
- Ensure each tenderloin is completely covered with coating then place on a rack inside shallow baking pan. Spraying extra olive oil on top prevents dry coating.
- Bake at 400°F for 10-12 minutes then flip each tenderloin.
- Continue baking for an additional 10-12 minutes. To brown the outside, place tenders about 6-inches from top broiler on high and broil each side for about 1 minute. (You'll need to flip the tenders again to brown each side using the broiler) For better browning, heat ¼ cup oil in frying pan and fry each piece, flipping once, until both sides are browned.
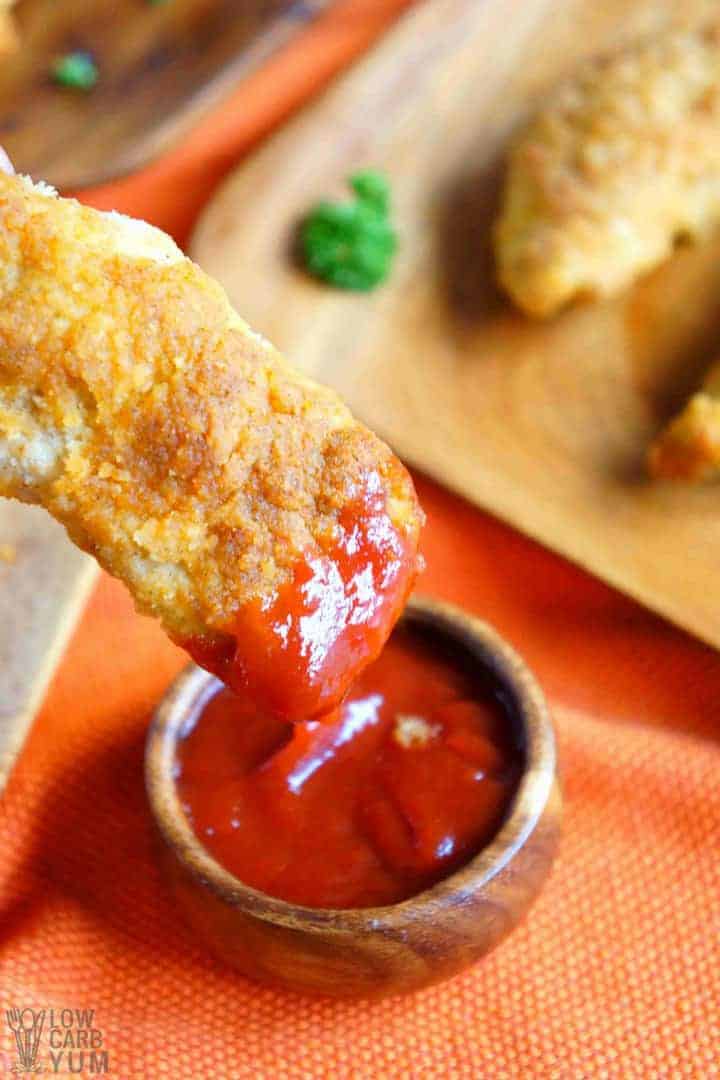
- Eat plain or dip in your favorite sauce.
Notes
176 calories, 7.8g fat, 345mg sodium, 4.1g carbs, 2.7g fiber, 1.4g net carbs, 23.6g protein Serving (2 tenders)
353 calories, 15.6g fat, 689mg sodium, 8.2g carbs, 5.4g fiber, 2.9g net carbs, 47.3g protein
Low Carb Sweeteners | Keto Sweetener Conversion Chart
Nutrition
Additional Info
Notes on Nutritional Information
Nutritional information for the recipe is provided as a courtesy and is approximate only. We cannot guarantee the accuracy of the nutritional information given for any recipe on this site. Erythritol carbs are not included in carb counts as it has been shown not to impact blood sugar. Net carbs are the total carbs minus fiber.
Copyright
© LowCarbYum.com - Unauthorized use of this material without written permission is strictly prohibited unless for personal offline purposes. Single photos may be used, provided that full credit is given to LowCarbYum.com along with a link back to the original content.
Jennifer
I made these exactly as written snd they turned out yummy!!❤️ Not crunchy, but fantastic flavor????!
I will be making these again!!
Ash
These don't go crispy or crunchy like chicken nuggets should be, it's like the flour never cooks and stays raw which falls off and coats your mouth with raw flour.
Lisa MarcAurele
Coconut flour doesn't crisp up. If you want a crispy coating, I recommend using crushed pork rinds or almond flour.
Rebecca Richardson
The video shows you dip the chicken in olive oil. not a beaten egg... so which is it?
Lisa MarcAurele
It works best with egg so that's what's recommended. I originally used oil but changed it to egg as it works better.
Judy
I followed the instructions, dipping them in olive oil and then the coating. I baked them for 20 minutes at 350 degrees and they are so very dry. They look amazing but are dry and bland.
Lisa MarcAurele
Sorry they didn't work out. Most people prefer dipping them in egg versus oil so I'll make sure that is clear in the instructions. I still recommend spraying the coating with oil before baking, even when egg is used.
Shay
I'm a novice cook trying to make some more healthy dishes and this is a great recipe. Tastes fantastic with the coconut flour!
Audra
Oh my WORD. These were amazing! I'm so glad I used 2 packs of boneless thighs instead of just the one! I sliced each thigh in half length wise before breading and brushed on avocado oil before air frying them. The sweet coconut flour combined with the spices worked so well together. This is most definitely a keeper, thank you!!
debra cameron
Thank you for such a great base recipe! I tried this using almond flour and flax seed meal with a special coconut thai spice blend that I have. I did coat with egg before dredging and then sprayed them with olive oil spray. They were such a hit that I might just put them in my weeknight dinner rotation.
Maria
They turned out so delicious and crispy! I used nutritional yeast instead of the parmesan and put them in the AirFryer. Thank you so much for the recipe! I'll be making them again!
Denise
This recipe taught me to ALWAYS read the comments. I used the olive oil instead of egg. The coating didn’t stick and they didn’t look anything like the photos. IMO waste of chicken.
Lisa MarcAurele
I've edited the recipes based on user feedback and my own experience making the recipes several times.
Elma Fitzsimmons
I watched the video, noted it said dip the chicken in olive oil then dredge. ???
Then I read the recipe and saw the egg for coating the chicken. Just a little error in the video.
Lisa MarcAurele
The original recipe used oil, but it works much better with egg so the recipe was changed. However, It's still a good idea to brush or spray oil over the coconut flour coating.
Almeda
Can this be made with almond flour?
Lisa MarcAurele
I've made them with a similar coating to my shake and bake chicken.
rebecca
here's my take:
1 -roll tenders in coconut flour
2-dip in egg
3-roll in chickpea breadcrumbs.
4-bake at 375 for 25 minutes.
Freeze for snacks. Use airfryer to reheat frozen tenders. 🙂
Mrs. Peel
I just loved this recipe. I love all your recipes. Your printing feature is the best. It includes the picture and the nutritional information and so many other sites do not. Whenever I find a recipe on the internet, I immediately go to your site and search for it and print it. You're the best! Thank you!
Lisa MarcAurele
My pleasure! The nutritional info is super important if you're low carb.
mrs lesley brown
looks scrummy!!
Cat G
Just made these for dinner in the oven and they were ok. I soaked the tenders in pickle juice all so they chicken was super juicy but i should have added more part cheese and seasoning to the flour. I used egg and the coating stayed on no problem. I broiled them for a few mins each side to brown them but it didn't change the flavour at all. I think they would be awesome in the air fryer. It's on my wish list but not in the budget now unfortunately, but when I do get one this will be one of the first things I try as i really do miss breaded chicken fingers.
Thank you for the recipe.
Connie F Farrell
I like this idea, however I am not allow diary, will they come out good without the cheese?
Lisa MarcAurele
Yes. I use nutritional yeast instead for Paleo.
Sue Miller
Wondering about using coconut milk/cream to dredge chicken with coconut flour? Has anyone tried it? How do you think it would turn out?
Lisa MarcAurele
I haven't tried it, but I think it should be okay.
Linda Roberts
What is the best method to re-heat these tenders. Even 1/2 a recipe is too much for one person.
Lisa
I like to reheat in the toaster oven.
Nancy
I made these dipped in olive oil, and baked on cooling racks as well, for probably a tab longer than called for, but that's because I am notorious for not setting the timer, lol. We loved the flavor, and not dry at all, but they didn't get crispy. The breading was soggy ? I did spray with canola oil instead of olive oil, not sure if that really affected the outcome. But I was considering trying them in an air fryer, wonder if that would help them crisp up? has anyone tried that? I think this is a great excuse for me to purchase one ?
Lisa
I've been meaning to try in the air fryer but haven't yet. It isn't meant to be a crispy coating as it's tough to get that with coconut flour.
Donna
Using an air fryer will correct most of the problems in these comments..crispy not dry from over cooking, no messy oil adding unneeded fat, no hot oven, but I would recommend using the dry, wet, dry method of preparation...
Lisa
I have tried these in the air fryer and they are so much better. I will update the recipe.
Heather
My husband has been following Paleo for years. Normally we fry his coconut flour tenders but it take so much "good" oil to do so. Today I baked them following your recipe. They were fabulous!
Thanks for the recipe.
Lisa
Thanks for the feedback Heather! I agree. I hate wasting all that oil too.
Sandra
I tried this recipe tonight for my significant other due to not having flour for him. Made sure I drizzled coconut oil over it several times. Turned out very moist with minimal coating coming off. Other than breading being slightly gritty to him, he said it was good. He is not eating keto but did tonight.
Lisa
Thanks for sharing that Sandra! Maybe you can convince him to make the switch. 🙂
Diane
When the kids were still home we used to make tenders dipped in Italian dressing and breaded with some Parmesan cheese mixed into the crumbs. I think that would work with the coconut flour and maybe help it hold together.
Tamara
These were terrible!!! The coating fell off and tasted chalky!
Lisa
Dipping the tenders in egg works better than oil (I'm sensitive to the whites so I used oil) and spraying the coating with oil before baking keeps it from being dry. I find the coating should be wet before baking.
summer
The flavor was good but overall the chicken was so dry! I liked the hint of sweetness from the coconut flour and I seasoned with fajita seasoning. The taste was great. The chicken is a choking hazard it was so dry!
Lisa
Did you spritz the oil on before baking? It may also help to dip the tenders in egg then the dry coating mixture.
Shirley
I have been reading through your appetizer recipes all morning and these WILL become meals for my husband and I. I too love seafood and those scallops look soooo good! Actually everything that I read so far looks very very good and I was happy to subscribe! I am older and it’s kind of hard for me to stand in the kitchen for long periods of time. These don’t seem so time consuming and even if they are, I will make them in 2 days if I can. This chicken looks fabulous! I hate cooking chicken on the stovetop so this baked alternative sounds fantastic. I will be making this tonight...thank you for your blog!
Lisa
You're welcome! You may want to try dipping the tenders in egg rather than oil, some prefer it that way.
Jim
I'm not sure why people are having issues. I used 1 egg and used a grated parmesan cheese. Other than that I stuck with the recipe and they turned out as I expected. Thank you for the recipe!
Lewahsu Fillmore
Hi, i did every little detail as you said only difference is i made them in a convection oven. I wouldn't recommend that. They took much longer to cook and the crust just flaked/ crumbled off when i pick them up. They taste great though. I'll try in the real oven next time.
Sherry Jasper
I use mayonnaise instead of egg or oil and an air fryer for a total of 10 minutes they turned out pretty darn good I did not have to spray them with oil to keep them from being dry
Lisa
Thanks for sharing the mayo method!
Tyler
The coconut breading was really mushy. Tasted good but the breading definitely wasn't right. Any thoughts?
Lisa
It's more bread-like if you dip the tenders in egg first.
Jen
It wasn’t as crispy as I’d like but tasted great. I sprayed a lot of oil and broiled it a bit with cheese. Still some parts were a bit soft and some crumbs fell off. I did dip it in egg first. Baked it at 425. Like 20 minutes and then 10 in the broilers
Lisa MarcAurele
If you want crispy, almond flour makes a better coating. I'd suggest something like what I used on my shake and bake recipe (just do a search for the recipe on the site).
Niki
I was excited to try this recipe and when I did the breading was not right for me. When I took a bite, I was eating loose breading and that was VERY unpleasant. I didn't mine immediately b/c i made them for dinner for the following night so i didn't have any crunch. I need to figure out what I did wrong so that I can try this again.
Lisa
I drench mine in oil before baking and make sure the coating starts to brown up. You can dip in egg before coating as well.
Angela D. Harris
Bake the chicken first.. Use a food processor to chop a handful of baked potato chips. After baking chicken, mix coconut flour and water to form a paste. Dip chicken in paste and then roll in baked chip crumbs..spray a little non fat cooking spray on chicken and bake until crust is golden brown.
Lisa
I'd use pork rinds rather than potato chips.
Christine
I coated these buggers in butter and oil and dipped the entire sahara desert tender in butter then again after baking. This was soooo bad. You cant fix these. This is my first recipe with coconut flour and Im really trying to convince myself to ever use this nasty stuff again.
Thanks for trying but these are truly bad.
Lisa
Did you try egg? Egg actually works much better, but I'm sensitive to the whites so I avoid using them.
lisa
coating in oil and then dipping in flour? everything falls off w oil as a coating. Egg is the thing. I've done these w JUST the coconut flour and no other spices and then made a lemon butter sauce. So very good. A few capers for good measure. 🙂
Lisa
I haven't had that issue, but it is more difficult to use than egg.
Mary Aviles
I just made this tonight and I’m happy with the way it came out at all even though I follow the recipe step by step! Will stick to my old recipe which is dipping chicken tenders in egg before fry or bake. So disappointed...
Laurie
OMG! These were fantastic! I was looking for a low carb garlic parmesan boneless chicken wing recipe and stumbled across this via google. I only left out the cumin because I thought it may clash with the flavor I wanted. These came out very moist inside, not super crispy on the outside, but not soggy either. After cooking I poured on a garlic-butter mixture and sprinkled on parmesan cheese. DH loved it! Will be making this one again. Thanks Lisa.
Lisa
You’re welcome Laurie!
Alex
Do you preheat the oven or? And can you use egg instead of olive oil before crumbing?
Lisa
I do preheat the oven and I find spritzing on olive oil helps keep the breading from being too dry. Either egg or olive oil is good to dip in before coating.
Pat Lavender
I tried these last night and the crust was much too dry. There was nothing in the instructions about spraying with oil. It might have made a difference. It tasted good, but was not pleased with 'crust'.
Lisa
It's in step 3, but I added a sentence to step 2 so it's not missed.
Jennifer
Do you think you could use melted ghee in place of oil?
Lisa
Ghee should be fine. I just like to make sure the coating is wet so it doesn't come out dry.
Alison
Or what about dipping in melted ghee? That has a high smoke point
Lisa
That would work.
Kristina
I just made these. Mine were not crisp at all. They were dry and the costing was falling off like sand or dust. I didn't see that they need to be "wet" w/oil until i read alllll the comments. Ive sprayed them w/olive oil & put back in the oven. We'll see. Kinda disappointed though. Should have emphasized "wet" at the beginning i think.
Lisa
Spraying with oil is in the recipe directions as well as in the video. Did you NOT watch the video or read the entire instructions?
Alison
Would coconut oil work? Would really prefer avocado oil because of the smoke point. Hate to make an oil carcinogenic, the smoke point for olive and coconut oil are very low.
Lisa
I typically use avocado oil. The smoke point for olive oil is 405F so baking at 400 should be okay.
dP_Ted
I wish I'd read this before I used coconut flour to coat my chicken! My husband and I both felt like we were eating chicken with powder on it. I'm going to try to repair these for dinner tomorrow to an edible state because we can't stand to throw out food.
Lisa
Did you spray the coated chicken with oil before baking?
Michelle
This recipe was very flavorful, but came out way too dry for me. The coating was almost like dust. Next time I think I will use a liquid dip like milk or egg and let the coating "set" a while before baking. Has possibilities because of the great flavor, but needs some tweaking, imho.
Lisa
Did you spray the coating with oil? If not, you'll want to make sure the coconut flour soaks in the liquid.
Michael Schneider
Lisa, Can you use Grapeseed oil instead of Olive Oil?
Lisa
Any oil should be okay Michael.
Jacquee Williamson
Can you use Pam spray?
Lisa
I don't recommend it, but it could be used.
CB
Wow, these are simple and very tasty just as written! I hardly even needed my dump ranch dipping sauce. Now the real test will be how they taste cold in my lunch tomorrow (no microwave and very little time). Either way, I'll be looking into all of your other recipes immediately:)
Lisa
Thanks for writing in to let us know they worked out! 🙂
Joseph
Made these tonight and they turned out great! I tossed them in Frank's Red Hot and melted butter and had them buffalo style. I tried the flavor of just a breaded tender and it was really tasty. Thanks!
Lisa
Yum! Buffalo chicken is such a great idea for these.
Didi
Hello Lisa!
Great recipe! I just have two questions:
1.) do I mix the flour, cheese and slices together? It does not mention this in the directions and I'm an idiot cook. Help.
2.) could I sub mayo for olive oil and if so how much mayo to olive oil.
Thanks a million!!!
Lisa
I fixed the directions. It missed the coconut flour. You dip the chicken slices in oil then press into the coating mixture. You may want to add oil to the mayo. It will work, but might be too thick for dipping.
Claudia
Over here they tend to soak chicken in butter milk first, then wipe it and roll it in the mix. Makes for a nice tender moist chicken :o)
Lisa
Great tip!
plasterers bristol
Wow these sound so good. Thanks for sharing.
Simon
Lisa
Thanks! Hope you give them a try!
Jackie
Thanks for sharing! I tried this -- had a whole bunch of chicken. Baked some right away, but wrapped the rest of the prepped tenders individually with plastic wrap and froze. We thought the initial batch was too dry. For the 2nd batch -- today -- I got several out from the freezer, drizzled lightly with carob syrup & rubbed it all over with my hands, allowed them to thaw, then broiled. Much better! They turned out crispier and crunchier, more succulent, plus the dark syrup added rich color. I'm sure honey would have a similar effect.
Lisa
I find spraying with olive or avocado oil is a better option.
Karen
Tried this today. Pounded the chicken instead of tenders & put in the grill pan. Once the meat rested it was moist & delicious. Will definitely make again.
Lisa
Thanks for sharing your method!
Larry
Karen do you have a cook book with only easy recipe using coconut flour
Cassandra Day
Another recipe we love!! I love coconut flour recipes because it's SO much cheaper than almond flour, and this is a very good coconut flour recipe! Hubby always has minor issues with the texture and defines it as almost "powdery," but he loves the flavor. I love it all and have ZERO complaints or alterations besides using chicken breast sliced into wannabe tenders. 🙂
Lisa
Thanks Cassandra! Glad to hear it was hubby approved 🙂
Sara
These came out just right for me! I made smaller nuggets and reduced the cooking time. They were delicious! Thanks 🙂
Lisa
You're welcome! So glad they came out for you!
Carlycark
Followed updated recipe 4/3/16. Chicken is super dry, and breading on outside is powdery and dry. 🙁
Lisa
You need to ensure that the coating is dampened before cooking. Spraying with olive oil after coating works well if it isn't.
Tahlia Crockett
Thank you for that point. I was trying to figure out why my coconut flour coated fish was coming out powdery and I bet this is why. I also look forward to trying this recipe tonight. I haven't been able to kick my French fry habit yet (though I buy organic which helps some) and I need something to eat them with! 🙂
Lisa
Spraying with some oil before baking usually helps.
Todd
Look up a recipe for zucchini fries
Gabriela
Hi. I have made these types of tenders in the past and always found them too dry. I now use crushed cornflakes instead, I am gluten intolerant. Two things I found to help a lot are to 1: brine the chicken for a while and 2) spray olive oil, real oil, on the coating. They come out perfect and are even crunchy the next day.
Lisa
That is exactly what helps when I make these. I make sure the coating is damp with oil. It keeps them from being dry. I guess I didn't make that clear enough!
George
People on these sites are trying to eat healthy. Crushing corn flakes made from Monsanto's GMO corn is not the way to get there
Judi Fikes
In your recipe you do not put the coconut flour in the list of combined ingredients (directions) just the spices! Figured it out but maybe you can correct that! Lots of comments about being dry so maybe I won't use it anyway...sounded good!
Lisa
It's 1/4 cup. The secret is to make sure the seasoning is moistened by oil or egg before baking. Even a bit of low carb milk works as a liquid that can prevent the coconut flour from being dry.
Melissa Williams
I made these tonight, though I did use almond flour based on the reviews. I didn't find them to be "crispy" but they weren't dry and they were plenty tasty, so as far as I'm concerned they worked out just fine.
Lisa
That's great to know! Thanks!
Chiquita
Made these tonight and let's just say epic fail. The tenders tasted like the coconut flour, it's like the coconut flour did not even bake, just sat on top on the tenders. Will not be making this again.
Lisa
You need to make sure the breading is not too heavy, only lightly dusted. A large bag to shake coating on works well. I found it also helps to press to make sure it's absorbed oil.
Bob
Loved the recipe. Tasted great!
Lisa
Thanks! So glad you liked them!
Suzi
Are you mixing the coconut flour with the Parmesan and spices?
Lisa
Yes. That's exactly what we did for the seasoned breading.
Melanie
Why not fry them in tallow?
Lisa
You could fry them if you like. I prefer baking because it makes less mess for me.
Iain
Tried this tonight, using oil not egg.
They were very nice, little on the dry side but thats what you get with coconut flour.
Maybe next time I will try adding some almond meal.
Lisa
Almond meal is a great addition for those who can do nuts!
Kris Tracy
Maybe oat flour mixed with the coconut flour would be less dry..Or you could marinate the chicken in greek yogurt first.
Lisa
Oat flour and Greek yogurt would add a significant amount of carbs. Oat fiber is a better choice. Dipping in an egg mixture works well too.
Linda
Thanks for all you do Lisa. I have prepared and enjoyed many, many of your recipes and want you to know that this is the 1st time I have ever NOT been happy with the result.
I may be a little biased because I have never had good luck when using coconut flour. 90% of the time, I use almond flour for all my baking and have always been satisfied with the results.
I'll be watching this site to see if you come up with some new ideas for the tenderloins.
Keep up the good work!
Lisa
Thanks Linda! I'm working on getting this recipe better. I made a batch without the convection fan and lowered the temperature and time. The chicken wasn't as dry, but the coating did not come out as crisp. I'll experiment a little with using the broiler at the end and maybe change the spice mix a little so the smoked paprika isn't so powerful (that was part of the comment I deleted).
Anonymous
Try marinating, before you bake.
Lisa
Thanks for the tip! I bet that makes them tender and juicy, preventing dryness.
Linda
Just tried this recipe today and they also turned out VERY dry. I made sure the chicken was totally covered with olive oil before applying the coconut flour mixture.
I baked them in my toaster oven at 450 degrees, but I could tell they were overdone even before the time called for in the recipe.
I ate just a few pieces. Any suggestions as to how to use up the remainder?
I wonder if perhaps next time going down to 375 degrees, for 20 minutes?
Linda
Correction
I baked them at 425 degrees, not 450.
Lisa
I find that with a toaster oven, I need to adjust temperature way down or take out in like half the time. I think it is because the food is so close to the heating element. Either reducing temperature and or time is needed if baking in toaster oven. Sorry this did not work out for you. I have a large toaster oven that I use occasionally for heating small amounts of regular frozen chicken tenders for my kids and I always set the timer for half the time on bag and reduce temperature slightly otherwise they burn. So keep a good eye on so you are sure to take out when just cooked. A meat thermometer could help ensure its fully cooked.
Linda
Just took my 2nd Chicken Tender batch out of the oven. Much better. Baked them at 375 degrees, 10 minutes on 1st side, flipped over, and just 5 minutes for 2nd side. Thank you for reminding me to use my thermometer! Checked the chicken and it was done after just 15 minutes total.
I still have not happy with the dryness in the "breading". I think next time I will go half and half with coconut and almond flour.
Linda
Correction
I am still not happy with.........................................
Lisa
I updated the recipe based on another comment and will do a little more experimenting to see if I can improve it further. I tried to reach out to the other commenter for more information, but they left a fake email address so I deleted the comment. They too had an issue with dryness so I'll try it on regular bake versus convection to see if that is the problem. I really appreciate you taking the time to let me know your experience so I can update the recipe.
Lisa
I have a convection oven which tends to make meat juicier than regular conventional ovens. This could be another reason why my tenders were not very dry. However, my first batch of coconut flour tenders used egg and not olive oil and they were very dry so I know the olive oil helps prevent dryness. Some people use crushed pork rinds, but I'm not sure if that would help with dryness. Thanks for sharing your experiences with us.
Katie
Hi Lisa, I have just tried out your recipe. Should have read your instructions all the way through, because i put too much coconut flour on the chicken which meant it didn't crisp. Had a thought about changing the olive oil for coconut oil. Next time i'll try it out. Thanks for your recipe, it was a nice change
Lisa
This can be a difficult recipe to get right. The key is to get little coating and ensure its wet with oil.